I normally hand cut my stencils using quilters template medium and an craft knife. I learned how to do this way back in the dark ages of my art classes at college. Using the template medium, I have discovered, makes for some very rough and jerky edges. For one of a kind stencils that won't be used more than once or twice, I will cut them out of freezer paper.
But this is a new method that I tried!
First you need a pattern. This was one I drew onto white paper.
Then you need to transfer it to an over head transparency. Since this was larger than an 8.5x11 sheet of transparency film I laid a piece of 4 gauge clear vinyl over my drawing and traced it using a black Sparpie.
I then used a product called EZ Screen and following the directions I got this lovely screen for use with a pounce pad!
Voila! Just a quick test on some black batting. I think I like this technique.
Showing posts with label tips and tricks. Show all posts
25 May 2017
06 August 2015
Proportion Scale Wheel
This is an odd tool that I use in my sewing room. It is my old proportion wheel from the days when I did technical illustration. Handy tool, this.
Why did I use this when I have quilting software that will do the job for me? Because I am not making a quilt. I am making a Schlepp Bag and have adjusted the size of the squares. The pattern calls for 8" squares but the pant legs of the blue jeans I am using only allowed for 6" squares. The first time I made this bag I followed the pattern explicitly and I found the bag to be a bit too big for my tastes, so cutting 6" squares will work fine.
It was easy to convert all the other measurements until I got to cutting the lining. Um, the pattern called for 22.25" squares. What do I cut?
I started with my known measurements: 8" and 6". I lined up the 8" mark on the inner wheel with the 6" mark on the outer wheel and came up with a 75% reduction (see in the little window?). Follow the markings around the inner wheel until you come to 22.25". It lines up with 16.75". THAT is the measurement of my new lining square.
I think, though, that I'll cut the easier number of 17" and then just deepen the seam. After all, it is the lining and a deeper seam will help. Or I could cut it off by sergeing the seams.
I love this wheel; is is well used. Can you see where I've scratched in the smaller numbers of .25", .5" etc? It covers from .12" all the way up to 90". If you put the smaller number on the inner wheel and the larger number on the outer wheel, then you are enlarging. Cool, huh?
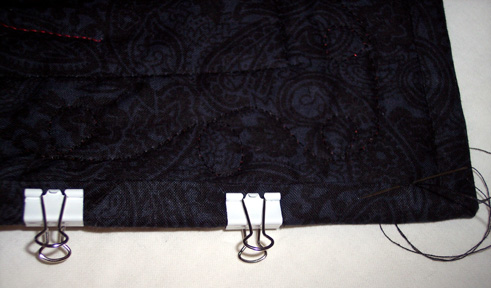
02 March 2014
A quilting tip for you
To keep your spool of thread on the horizontal thread holder, use a large sized knitting needle point protector.
12 February 2014
PSA
Public Service Announcement
Several years ago, I used some spray adhesive ala Patsy Thompson, but I wasn't quite as neat. Yes, I got some of that sticky, tacky adhesive on my sewing room floor right under the design wall. It sat there collecting bits of fluff and thread and whatever else went it's way.
Nothing I tried would get it off. I was considering buying some DK5 cleaning agent, but I didn't really want to do that since I have stopped using spray adhesive on quilts and I didn't want the rest of the agent on hand. I tried things again with no good result. Then I remembered I had this stuff in my art supplies (I was going to do a toner transfer, okay?) and guess what?
It worked!
I put some on a cloth and wiped the sticky, and now linty, surface. It all came off but left the surface slippery. Not what I intended. Of course, then I had to mop the floor with soapy water and rinse it.
You're welcome.
02 June 2008
Binding the ALQS quilt

Here's a trick: I don't use pins at this stage, I use three (3) micro binder clips. These are the smallest you can get at Office Depot. I stitch up to the first one and move it behind the third one in a leap-frog fashion. They stay put and I do not get scratched by a pin.
29 April 2008
Tuesday Tips and Tricks
I have a two-fer for you! Carole at Quilting Adventures has a post today on an applique technique using 2 layers of freezer paper. She also talks about her mini iron and how hot it gets: it has burned a hole in her ironing board because of the iron's rest. I did not like the cheesy little rest that came with my iron so I started putting it in an empty coffee mug. I also use the selvage of some fabric to tie up the cord when I'm not using the iron. So there you have it, a Tuesday Tip.
Subscribe to:
Posts (Atom)