
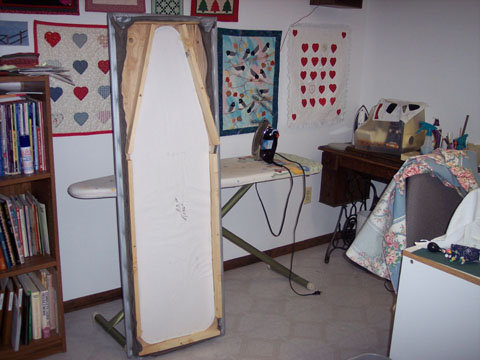
One thing I was asked was what I used for legs. I removed the 'big board' from the ironing board so you could see the underside of it. The legs are the ironing board legs.
But let me tell you how to make one. OK?
- Start with a long piece of paper. If you don't have paper long enough then you can tape some sheets of newspaper together.
- Once you have your paper, lay it on the floor.
- Turn your ironing board upside down onto the paper.
- Trace around your ironing board using a pencil. This is your template.
- Straighten up your lines and then cut out your template on the drawn line.
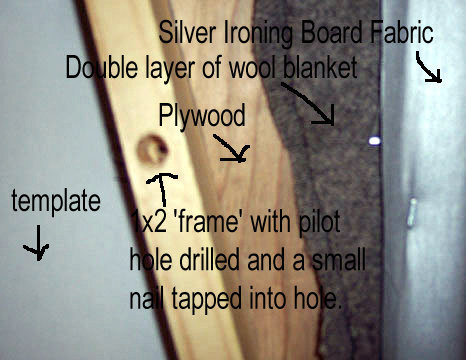
- My plywood measures 19" x 58". I centered my template onto one side of the plywood and using masking tape, I taped it down. I used plywood because it can take water and steam and not buckle or warp like multi-density fiberboard or is as rough as particle board.
- Next CarGuy cut 1x2 wood into the lengths needed to outline the template.
- He drilled pilot holes into the wood and then secured the 1x2 wood to the plywood using short nails making sure that the nails did not go all the way through the plywood.
- The inside edge of 1x2 wood is right on the edge of the paper template. He did not remove the template so I can still see all my numbers and measurements. *g*
- Now you need to make a cover for your board. Lay your silver fabric (you can purchase it from here) face down on the floor.
- Next lay your double thickness of wool blanket on top of the fabric. I like a hard surface for pressing my blocks and tops so I don't use anything besides the blanket and the fabric.
- Lay your board flat side down on top of the blanket layers. It's almost like sandwiching a quilt!
- Now wrap the blanket and silver fabric around to the back and staple. Don't be shy about using a lot of staples. After all, nobody is going to see the bottom unless you take a picture for your blog! *G*
I have never recovered this and it is about 5 years old. I suppose the wool blanket is now felted *g*.
This comment has been removed by the author.
ReplyDeleteFantastic! I'm definitely tucking this little tutorial away for future reference.
ReplyDeletePaula, you ROCK! I told my husband I wanted one of these, and he said find him some plans. I told him we don't need no stinkin' plans, I know just what to do.
ReplyDeleteWell, he really reacts better to something in the way of a plan, not just me telling him how to do it. Thank you, thank you.
You're a goddess (and CarGuy ain't too bad either)!
This is great, I have a much smaller version of this for taking to retreats or classes. Thanks for sharing.
ReplyDeleteThat's very nifty. Thanks for the tutorial.
ReplyDeleteThis is great thanks!!
ReplyDeleteVicki
Those guys do come in handy sometimes.
This is a piece of genius. Thanks for the tutorial.
ReplyDeleteThank you for this tutorial, my DH found a scrap piece of plywood and made this board for me. The only expenditures were the 1 by 2's and some warm and natural batting and table cloth from the dollar store for the cover.
ReplyDeleteWe sprayed some adhesive to put some aluminum foil underneath the batting.
Works like a charm, thank you so much.
GGJ Spring, TX
Thanks so much for this tutorial!!! You explained it so well I'm sure I can do it (no DH unfortunately). Thank you thank you thank you :)
ReplyDeleteThis tutorial is great. I'm going to Lowe's tomorrow to get the wood and the strips, and I have plenty of batting (no wool blankets, unfortunately. I bought "ironslide2000" from JoAnns online, and it should be here next week, so I can staple up everything except that. This will help me so much! Thanks for posting it!
ReplyDeleteSeveral years ago Dave and I made one for me too. I couldn't live without the big board now!!
ReplyDelete