

Today's pin was my mother's. She collected tie tacks, actually. This is a really sweet little Cloisonné tree from Hallmark Cards. It is actually one of my smaller pins.
I remembered to stick my camera in my bag after I recharged the battery, but I forgot my USB cord. So to get you this pic, I scanned in my little tie tack.
I've been working in the studio lately. And not just cutting fabric for kits either -- I actually have quilt content. This was something that just 'happened'. It was not on any UFO list. You have to be spontaneous sometimes, you know.
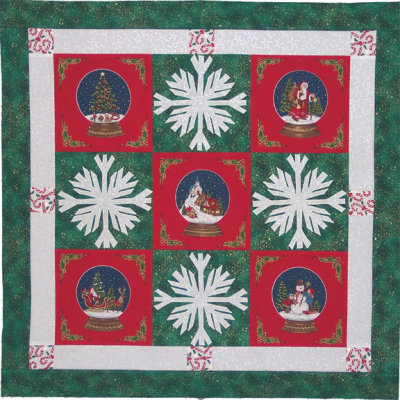
When I was sorting and refolding some of the stash, I ran across all the "cheater" panels that have accumulated over the years. I remember buying this Christmas one and that it had 6 blocks in it. I used one of them for something but can't remember what. That left me 5 blocks that measured 8.25.This wall hanging or table topper (I haven't decided) was made entirely from stash and is just a large 9-patch. I intentionally used a green that was the same value as the red because I wanted the background(s) to blend a bit. The white has some silver stars printed on it and each of the snow globes has a different scene.
I cut a snowflake from copy paper and decided I liked that one and there was no need to do any further snowflakes. I transfered it to freezer paper, layered 4 sheets of freezer paper and cut out 4 snowflakes. I ironed the freezer paper to the back of the green print and layered on an equal sized square of white (wrong side of white to right side of green). OK, this is turning into a tutorial so I'll write it that way...
Pin each bundle together so it won't shift, turn the bundle over so you are working on the side that has the snowflake and, at the sewing machine, straight stitch around the snowflake using thread that matches the top layer; in my case white. When all are stitched, flip the bundle over and trim away the excess white fabric, being careful not to clip the green fabric, leaving the snowflake. Zigzag or satin stitch around the snowflake on the right side. Trim the excess green fabric from under the snowflake if you want, I left it in. This is a form of back basteing only done on the machine.
I didn't have enough of the white fabric to make a comple border so I pieced in some 2.5" squares of a candycane fabric. I'll probably quilt this up over the weekend.
Never knew you collected pins, or bells for that matter...the things I learn reading your blog! Ironically, I have a Christmas tree pin with rhinestones almost just like the one that was Mom's. I recently had it repaired..the rhinestones were $2 each, just in case you are wondering.
ReplyDeleteI'm gathering up stuff to send you. Every now and then I see something (usually it's a dragon), I get it, but end up never sending it. Thanks for being patient with me. :)
Little Sis
No tutorial is "flaky" - I think it is a great idea - love your snowflakes - and I see you changed your profile photo to the snowflake too!
ReplyDeleteCheers!
Evelyn
super tutorial! love the little quilt. sometimes being spontaneous results in super results.
ReplyDeleteHi Paula, I'm gradually getting back to where I read again, and catching up(sort of) on blogs. I love todays pin..it's just so sweet.
ReplyDeleteAnd I like the spontaneous wall/topper with the preprinted Santas and your snowflakes...very creative. I had those same Santas, must have been back in the late 80's or early 90's. I gave the last of them away, I think..LOL Hugs, Finn