Showing posts with label quilting notion. Show all posts

30 November 2021

November 2021


Look what my Hunny made for me! I’ve always wanted a quilt ladder and once I put it on my Christmas Wish List he just made one! He’s a keeper. 


I’ve been doing a lot of sewing and quilting that’s resulted in a stack of completed donation quilts. The pattern is Strippie Quilt from Maryquilts.com. She has a lot of free and easy quilt patterns that I find appropriate for donations. For the backs on these quilts I used fleece because it makes them so nice and cuddly. 


Do you remember last January I made 3 chenille teddy bears? You can read about them here. Anyway, I donated them to the U.S. Marines Toys for Tots. I went to the recruiting center in my town and handed them over. I think I was the first one to donate there this year.


14 September 2015

A New/Old Favorite Tool

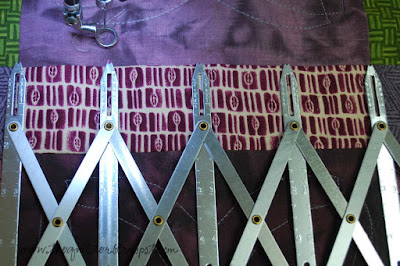
Have you ever used the SimFlex Expanding Sewing Gauge? It is great for easily getting equally spaced buttonholes, buttons, pleats and other things when sewing. This might look familiar to those of you who have done garment sewing in the past.


Here's how I use it now. Quilting! Yes, it is great for quick unmeasured marks when quilting. This first photo is of the area that needs the tic marks. That print fabric is 2x8 and I want equal 2" dividers. I could measure it out but that is too fiddly and slow for me. I want to get this quilt done.


Here I have set up my gauge for marking. (Well used quilting gloves, huh?)


Here's a better shot. By lining up one of the 'fingers' at each end of the 8" strip I have the positions I need to make the marks. What the photo doesn't show is the rest of the gauge off the right edge of the photo.


Isn't this sweet? I love finding new uses for older tools.

11 December 2013

Quilt Hanging System

I have a huge stairwell wall that goes from a cathedral ceiling to the basement and a large portion of the wall is visible to the main portion of the house. I have always wanted to hang a quilt (full size or larger) on it and then be able to change the quilt out for another when the whim strikes, but the logistics of hanging something on this wall have mystified me. Until now. I want this system.
http://www.hangupscompany.com/Pulley_systems.html
Click on the logo and it will take you to the page with the system I want. 
The first step is to purchase some of this
so I can adhere a level horizontal string line to the wall from the entry way to the hallway at the height where the top of the quilt will hang. This line will also give me a visual so I can adjust the placement. This I can do by myself. Once I have the measurements from putting up the level string line, I can fill out the form and order my system.

When the system comes in, rental of one or two of these
for 17.95 each for 4 hours will, hopefully, make installation easier. That is if I coerce a couple of elves into helping.


07 July 2013

How I spent my day


also know as the frog stitch: rip it, rip it, rip it.

I became very familiar with my favorite seam ripper today. Have you ever used this style? I love this as it has a replaceable blade but watch out 'cause it is very, very sharp.

What was I working on? Well, I had this brilliant idea to just quilt around the design on the backing of a quilt. It would have worked too, on any other fabric than this one. ;) After one pass, I turned it over and that's when I realized that the design was just too strange to look nice.

And so, Jack the ripper became my friend today.


10 April 2012

Fail Saved

For the yearly guild retreat, I took several quilt kits that I had pre-cut. One of them was this one from the Moda Bake Shop: American Glory. What I forgot to include in the kit was either the EZ Angle ruler (link goes to a tute) or some Thangles to make the half square triangles. What's a quilter to do? Out came the ruler and pencil and I drew lines on the light fabric. It would have worked too, but because of several measurement errors (moi? make a mistake?) some of the HST were the wrong size. The pieces and parts were repackaged to trim down at home.

I don't know about you, but I have a hard time keeping my ruler from slipping when I'm trimming down HST. Anyone else have this problem? Since there are a lot of HST, an easier method is required. Bloc-Loc to the rescue. Remember that old adage about the right tool for the job? THIS is the right tool for trimming HST.
Update: here's a link for the shopping website of this ruler: http://usaus.us/cart/quilting-rulers-c-12.html

Oh how I love this Bloc-Loc ruler! It is making cutting down these HST so much easier.  See that 'double line' down the diagonal? That is actually carved out on the back of the ruler so it snugs up to the seam.


Before you start, press your HST so that the seams are flat flat flat. No smiley lips like you see on this one.
Lay the Bloc-Loc ruler on the HST. I will be trimming this HST to 3"; see how the number 3 is both on the horizontal and vertical sides of the ruler? Make sure the diagonal of the ruler is on the seam and trim.
Here there are two sides of the block trimmed down. Now, turn the block 180°. If you try to fit the ruler up against the seam after turning the block, it won't work right.
You need to swivel the ruler 180° also. See? You can read the label on the ruler now. Okay, go ahead and trim the other two sides of the block.
Here are the piles of trimmed pieces. More of the HST need to be trimmed down.

I said it once and I'll say it again: I love my Bloc-Loc ruler. In fact, I am going to buy the set for the two different Flying Geese. Try the ruler, you'll like it. I have no affiliation to Bloc-Loc, I'm just a happy customer.

**Update: After I trimmed down all the pieces and parts, I realized I had enough HST to make another whole quilt! So I proceeded to cut more squares and rails.